Table of Contents
The split jerk is an Olympic weightlifting movement used to drive a barbell overhead and receive it in a stable split stance. It requires coordination, leg drive, shoulder stability, balance, and precise footwork. It is commonly performed as part of the clean and jerk and can help athletes develop explosive power and overhead strength.
Learning the split jerk takes practice. The goal is to drive the bar upward with the legs, move under it quickly, lock the arms overhead, and recover to a balanced standing position. Start with a light barbell or training bar while learning the movement, and increase the load only when your technique is consistent.
What Is the Split Jerk?
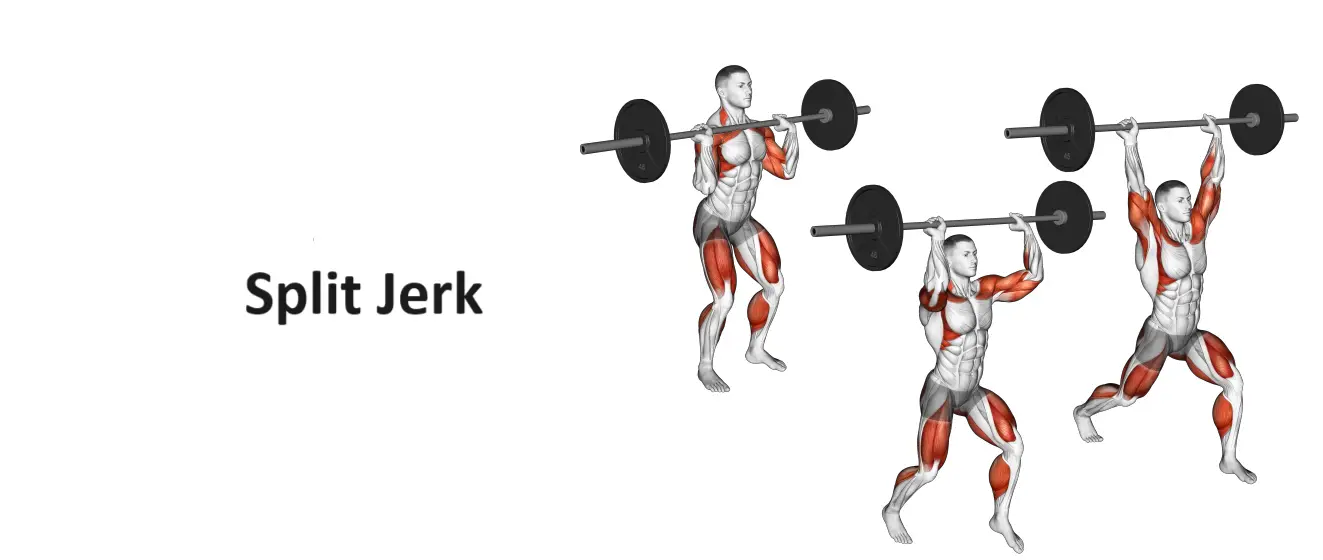
The split jerk is a weightlifting exercise in which the lifter moves a barbell from the shoulders to an overhead position while splitting the feet forward and backward to receive the weight. The front foot bends at the knee while the back leg extends behind the body, creating a stable base beneath the bar.
Unlike a strict overhead press, the split jerk uses a powerful leg drive and a quick movement under the bar. This allows trained lifters to receive heavier loads overhead than they could typically press slowly. Proper timing, a stable trunk, and controlled footwork are essential.
How to Do a Split Jerk
Practice the movement with a light load before progressing to heavier weights. Keep the bar path controlled and stop if you experience pain or cannot maintain a stable overhead position.
1. Set Up the Barbell
Begin with the barbell resting across the front of your shoulders in a secure front-rack position. Keep your elbows positioned so the bar is supported on the shoulders, with your hands gripping it comfortably. Stand with your feet approximately hip-width apart and your weight balanced across both feet.
Brace your core, keep your chest lifted, and look straight ahead. Your torso should remain upright throughout the dip and drive.
2. Dip Vertically
Bend your knees slightly to lower your body into a short, controlled dip. Keep your heels grounded, your torso upright, and your knees tracking in the direction of your toes.
Avoid dipping too deeply or leaning forward. A consistent vertical dip helps you transfer force into the bar without sending it forward.
3. Drive the Bar Upward
Extend your knees and hips forcefully to drive the bar upward. Keep the bar close to your body and aim to send it vertically rather than pushing it forward with your arms.
The leg drive creates the initial upward momentum. Your arms help guide and stabilize the bar, but the movement is not meant to be a slow shoulder press.
4. Split Your Feet and Move Under the Bar
As the bar rises, quickly move your feet into a split stance: one foot steps forward and the other steps backward. Lower your body under the bar while extending your arms to receive it overhead.
Keep your front foot flat and your front knee bent. The rear foot should land on the ball of the foot with the heel raised. Maintain enough space between your feet from side to side to help you balance.
Your head should move into a comfortable position beneath the bar, with the bar aligned over your shoulders and trunk. Avoid allowing the bar to drift far in front of you.
5. Stabilize the Overhead Position
Lock your elbows and actively stabilize the bar overhead. Keep your torso controlled and your abdominal muscles engaged. The bar should be balanced over your base of support rather than hanging forward or behind you.
Pause briefly if needed to confirm that the bar is stable before recovering your feet.
6. Recover to a Standing Position
Recover with control rather than bringing both feet together at once. A common method is to move the front foot back partway, then bring the rear foot forward to meet it. Keep the bar locked overhead until you are standing upright with your feet aligned.
Only lower the bar once you have regained a stable standing position and can do so safely.
Proper Split Jerk Position and Recovery
A strong split position makes the lift more stable and easier to control. The feet should be separated both front to back and side to side, rather than landing on a narrow line.
Use these checkpoints:
- Front leg: The foot stays flat, and the knee bends in line with the toes.
- Rear leg: The heel stays raised, with the foot supporting the split position.
- Torso: The trunk remains braced and controlled instead of twisting or leaning excessively.
- Arms: The elbows are locked overhead when receiving the bar.
- Bar position: The bar stays balanced over the body and base of support.
- Recovery: The feet return to a parallel stance in a deliberate, controlled sequence.
The ideal split length varies with an athlete’s proportions and mobility. Practice finding a stance that lets you receive the bar securely without overstretching the hips or losing balance.
Muscles Worked in the Split Jerk
The split jerk recruits muscles throughout the lower body, trunk, shoulders, and upper back. The main contribution of each muscle group depends on the phase of the lift.
Quadriceps
The quadriceps help extend the knees during the dip-and-drive phase. They contribute to the force that initiates the bar’s upward movement.
Glutes
The gluteal muscles contribute to hip extension and help generate power during the drive. They also assist with controlling the hips and maintaining stability during the split and recovery.
Calves
The calf muscles contribute to force transfer through the feet and help stabilize the lower legs. Foot positioning and balance are especially important when receiving the bar in a split stance.
Shoulders and Triceps
The shoulders help position and stabilize the bar overhead. The triceps extend the elbows to establish a locked-out receiving position and maintain arm stability.
Core Muscles
The abdominal and spinal stabilizing muscles help keep the trunk braced as the bar moves overhead. A stable torso helps transfer force efficiently and reduces unwanted movement during the split.
Upper Back
The upper-back muscles help support the front-rack position and stabilize the shoulder girdle during the overhead catch. They also help maintain control of the bar throughout the lift.
The split jerk is a coordinated full-body exercise. No single muscle group performs the entire movement independently.
Benefits of the Split Jerk
Develops Explosive Power
The dip-and-drive phase trains the ability to produce force rapidly through the lower body. This quality is useful in Olympic weightlifting and other sports that involve explosive movements.
Builds Overhead Stability
Receiving and holding a barbell overhead challenges the shoulders, triceps, upper back, and trunk. Proper technique helps develop control under load.
Improves Coordination and Timing
The split jerk requires the legs, hips, arms, and feet to work in a precise sequence. Regular technique practice can improve movement coordination and body awareness.
Trains Balance in a Split Stance
The receiving position challenges balance and control in both the front-to-back and side-to-side directions. Learning to recover smoothly is an important part of performing the lift consistently.
Supports Olympic Weightlifting Performance
The split jerk is a key component of the clean and jerk. Improving its technique can help weightlifters receive heavier loads more consistently when their strength and training level support it.
Common Split Jerk Mistakes and How to Fix Them
1. Leaning Forward During the Dip
Why it matters: Leaning forward can push the bar away from its intended vertical path and make the lift harder to control.
How to fix it: Practice shallow dips with an upright torso. Keep your weight balanced over your feet and use a light load until the dip feels consistent.
2. Dipping Too Deep
Why it matters: An excessively deep dip can make it harder to reverse direction quickly and consistently.
How to fix it: Use a short, controlled dip that allows you to drive upward powerfully. Practice with pauses or light loads to develop a repeatable movement.
3. Landing With a Narrow Split
Why it matters: Placing the feet almost in line with each other can reduce stability and make balance harder to maintain.
How to fix it: Practice split-stance footwork without a barbell. Land with enough side-to-side separation to create a stable base while keeping the front and rear feet pointed comfortably forward.
4. Pressing the Bar Instead of Moving Under It
Why it matters: A slow press can waste the momentum created by the legs and make the lift more difficult.
How to fix it: Focus on a strong vertical drive followed by a quick, coordinated movement under the bar. Use a training bar or light weight while learning the timing.
5. Losing Balance During Recovery
Why it matters: Rushing the recovery or moving both feet at once can make the bar unstable overhead.
How to fix it: Hold the split position until the bar is stable. Move one foot at a time in a controlled sequence and keep the arms locked until you are standing upright.
6. Failing to Lock Out the Arms
Why it matters: Bent elbows can make the overhead position less stable and indicate that the bar has not been securely received.
How to fix it: Practice receiving the bar with straight elbows using a light load. Improve shoulder control and reduce the weight if you cannot maintain a secure overhead position.
7. Allowing the Bar to Drift Forward
Why it matters: A forward bar path can make it difficult to stay balanced beneath the load.
How to fix it: Keep the torso upright during the dip, drive the bar vertically, and move your body under it. Video feedback or coaching can help identify consistent bar-path errors.
Split Jerk Variations
Different jerk variations can help develop specific parts of the movement. Choose a variation based on your technique, training experience, and goals.
Power Jerk
In the power jerk, the lifter drives the bar overhead and receives it with the feet moving outward into a wider stance, rather than using a front-and-back split. It can help develop the drive and overhead receiving position.
Learn more about the power jerk technique and variations.
Squat Jerk
The squat jerk involves moving the feet into a wider stance and receiving the bar in a deep squat position. It requires substantial shoulder mobility, stability, and coordination, so it is best practiced progressively with appropriate coaching.
Read our guide to the squat jerk.
Push Press
The push press uses a dip and leg drive to help press the bar overhead, but the lifter does not move the feet into a split to receive it. It can be useful for practicing coordinated leg drive and overhead strength, although it is a different movement from the jerk.
See our guide to the push press technique and benefits.
Split Jerk Footwork Drills
Footwork drills let you practice the split stance and recovery without the demands of a heavy barbell. Start from a standing position, step into your split, check your balance, and return to a parallel stance under control. Repeat on both sides when appropriate for your training.
Tips for Practicing the Split Jerk
- Start light: Use a training bar or light barbell until your movement is consistent.
- Practice footwork separately: Learn the split and recovery without a heavy overhead load.
- Prioritize the vertical drive: Keep the torso upright and avoid sending the bar forward.
- Use a repeatable stance: Find a split position that feels stable and comfortable.
- Build overhead control: Make sure you can lock out your elbows and stabilize the bar before increasing the weight.
- Progress gradually: Increase the load only when you can maintain good technique.
- Get qualified feedback: A knowledgeable weightlifting coach can help correct timing, bar path, and foot placement.
If you experience pain, dizziness, or an inability to control the bar, stop the exercise and reassess your technique and load before continuing.
Frequently Asked Questions
What is the split jerk used for?
The split jerk is primarily used in Olympic weightlifting as part of the clean and jerk. It trains explosive leg drive, overhead stability, coordination, and the ability to receive a barbell in a stable split stance.
Which muscles does the split jerk work?
The split jerk involves the quadriceps, glutes, calves, shoulders, triceps, core muscles, and upper back. The legs generate much of the initial drive, while the upper body and trunk help receive and stabilize the bar overhead.
Is the split jerk suitable for beginners?
Beginners can learn the movement with a training bar or light load and careful instruction. It is important to develop the front-rack position, vertical dip and drive, split footwork, and overhead stability before adding substantial weight.
What is the difference between a split jerk and a power jerk?
The main difference is the receiving stance. The split jerk uses one foot forward and the other backward, while the power jerk generally uses a wider stance with both feet moving outward. Both require coordinated leg drive and overhead control.
How can I improve my split jerk balance?
Practice split-stance footwork without a barbell, maintain side-to-side separation between your feet, and hold the receiving position until you feel stable. Controlled recovery drills and feedback from a qualified coach can also help.
Should I use a heavy weight when learning the split jerk?
No. Start with a light load and focus on consistent technique. Increase the weight gradually only when you can drive the bar vertically, receive it with locked arms, and recover under control.
Conclusion
The split jerk is a technical Olympic weightlifting movement that combines explosive leg drive, precise footwork, and overhead stability. Learning the correct setup, vertical dip and drive, split receiving position, and controlled recovery can help you perform the exercise more consistently.
Start with light loads, practice the movement in manageable stages, and prioritize control over weight. With consistent practice and suitable coaching, you can develop the coordination and stability needed to progress safely.